how to create listing
how to convert
how to change listing info
how to use split and assign
how to upload docs (upload, email, and fax)
how to move a doc to trash
how to send bundles
how to open & view document bundles
how to share files
how to download and share archived files
HOW TO CREATE A LISTING
1. From the home page, click on Create Listing.
First, you will be able to search for your property's address in the Search for Address window. Thanks to a recent update, creating your Listing is now easier than ever before. Begin typing into the Address field, and you will see search results powered by Google. As search results come up, click on the best match for your property.

Support Tip: If a correct match doesn't populate, or the property is a land listing that may not yet be "searchable", close out of the Search for Address window to enter the address manually.
2. As shown briefly above, after clicking on the best match for your property address, search results will populate. Depending on the information we are able to find, you will see a few different results that you can use to create your file. You may see:
-The property address found by Google
-The property information found by SkySlope
-MLS Search Results
-zipForm Search Results (if your account is integrated with zipForm)
For example, let's click on the MLS result to proceed with that information.

3. After clicking on the search result, the page will redirect to the Listing Tab. On this tab, the required information is listed with red asterisk (*). Based on the information we are able to find, some of this information may already be filled out for you. Complete the required information, and then click on Next in the lower right corner.


Support Tip: Don't have a year built? Enter "0000". Also, if your Listing Expiration Date or List Price ever change, you can always come back to this page and update your information.
4. After clicking on Next, the Contacts Tab will populate.

There are 3 available contacts in a Listing file, but only 1 is required: the Seller/Landlord. Fill out the required Seller/Landlord info. Then click on Save. If there are 2 sellers, the second seller can be added by clicking on +Add Seller after the first one is saved. After saving the contact(s), click Submit to move forward.

Pro Tip: Use the Search Contacts field to fill in names of people added into the Account Directory, or previously entered into SkySlope files.
Support Tip: Add your client's email address. Even though that field isn't required, it will save a step later in DigiSign! Work smarter, not harder!
5. After completing the Contacts Tab, the Checklist Tab is next. The Checklist is the core of a file in SkySlope. This is where documents are submitted for admin/broker review.

What is a Checklist? It's a list of required documents that are decided by your broker based on the file type. The required documents need to be uploaded and attached to the Checklist in order for the file to be seen as complete and ready to accept an offer. Here's an example of a Listing Checklist:
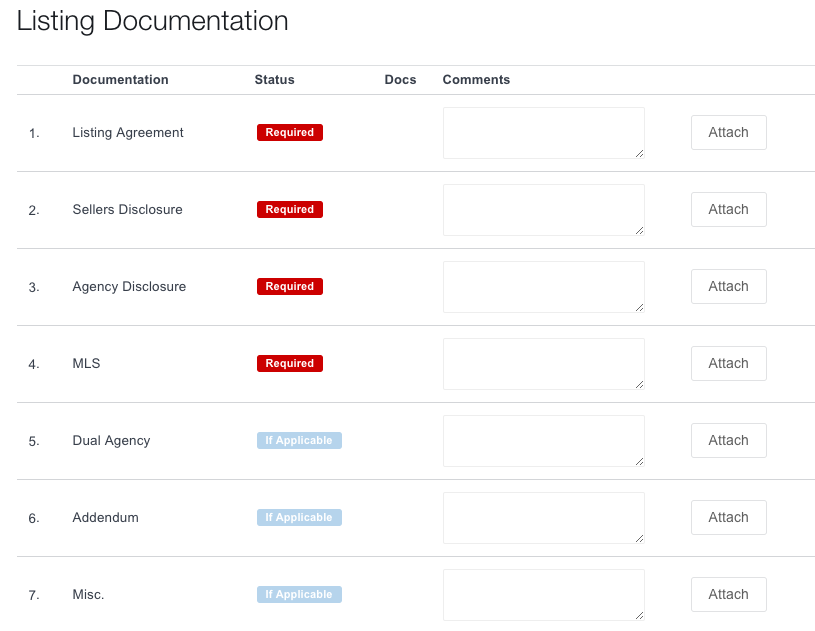
Documents that are marked If Applicable only need to be uploaded if the particular document is relevant to the file you're creating. For example, a Lead Based Paint Disclosure may be marked as If Applicable, and would only need to be uploaded if the house was built pre-1978.
Not sure how to attach documents? Click here [LINK] to learn how.
Support Tip: See a document that's marked as required that isn't relevant to the file? Leave an "n/a" comment for your admin to see so they can change the status of the Checklist item from Required to If Applicable.
Document Tab

The Document tab is the section of a property file where all documents are housed. This is a great place to store documents that are related to the file, but not listed on the Checklist. The Document tab can be used to forward documents to DigiSign, break-down large PDF packets into individual documents, and even send emails.
Log Tab

The Log is where all action taken within a file is stored for compliance purposes. Whenever a change is made, a document is uploaded/unattached, or an email is sent from the file, that action is recorded on the Log.
Tasks Tab

When using Tasks within SkySlope, all tasks assigned to a specific property file can be viewed and managed on the Tasks tab of that file. New tasks and email reminders can be added to help you stay on top of your deals.
HOW TO CONVERT A LISTING INTO A TRANSACTION
If your Listing has an accepted offer, and the buyer's docs are ready to be uploaded, the process is a piece of cake! Keep reading to learn how to convert your Listing into a Transaction, and upload the documents to the Transaction Checklist.
1. Open the Listing file by clicking on Manage Listings on the home page. Locate your file and single-click to open. Once the file is open, navigate to the Checklist tab.

Support Tip: Not seeing the Accepted Contract button? That means there are still some documents that are still marked as Required. Those docs will need to be uploaded, or changed to Not Required by an admin, before the Accepted Contract button will appear.
2. From the Checklist tab, click on the button in the upper right that says Accepted Contract. After clicking on Accepted Contract, the file will convert from a Listing to a Transaction and the Transaction tab will generate.

3. As seen briefly above, the Transaction tab has generated. Much like the Listing tab, the Transaction tab has some required information listed with a red asterisk (*). Some information will have carried over from the Listing file. Complete the required information, and then click on Next in the lower right corner.

4. After filling out the Transaction tab, the Contacts and Commission tabs will need to be completed. Once those tabs are completed, the Checklist tab will become available and the sales docs can be added!

HOW TO CHANGE INFORMATION IN YOUR LISTING FILE
1. From the home page, click on Manage Listings. Search for & locate the file. Then, single-click on the address to open the file.

2. The file will open to the Listing tab. This is where all of the information pertaining to the Listing is located. Locate the field that needs to be changed, whether it's the List Price, the Listing Expiration Date, or the Co-Agent (etc).
In that field, make the necessary change. To change the price, clear the old price and enter the new price. To change the date, select a new one from the calendar, or manually enter a 2-digit month, 2-digit day, and 4-digit year.

Pro Tip: Don't add the dollar sign, comma, or period. We'll add it for you!
Once the proper changes have been made, click on the Next button in the lower right hand corner. This is important! Clicking on Next saves the changes made to the file.
If necessary, more than one change can be made to a file at a time. And that's all it takes!
HOW TO USE SPLIT AND ASSIGN
1. First, we're going to start with a PDF packet that is already in your SkySlope file. Click on Manage Transactions or Manage Listings from the home page to locate your file. Then single-click on the address to open your file.

Support Tip: Don't have your document uploaded yet? Click here to learn how.
2. Once you've located your PDF Packet, you'll click on the Split button on the right side of the page. Then, the Split Window will open for you.

3. You will use the Split Window to break down your packet into individual documents. On the left side under New Document Name, type the name of the first document in your packet. When typing the name of the document, click on the corresponding Checklist item that pops up below. Then enter the page range for that document.
Example: "Listing Agreement" - From page 1 to page 2

Support Tip: Don't know the name of the document to search for? Click in the New Document Name field, and then tap on your keyboard's space bar to show all of the Checklist items. Then click on the Checklist item name to select it.
4. Next, you will follow the same steps for the rest of your documents. Enter the document name, and select the corresponding Checklist item. Then enter the page range by number.

Support Tip: Trying to split a 1-page document? Just start and end on the same page. Ex Above: MLS Printout - From page 7 to page 7.
5. Once you've broken down all of your documents, you will click on the blue Split & Assign button at the top of the page. This will split your documents, and assign them to the Checklist in the selected locations.

After clicking Split & Assign, you'll be able to either Return to Docs or Go to Checklist.
Success! Now that's a job well done!
HOW TO UPLOAD DOCUMENTS
If you have documents that you're ready to add to your SkySlope Checklist to submit them for review, the process is a breeze. There are a few different ways you can upload your documents. You can upload them directly from your computer, you can send them to your file via email, or you can even fax them!
Let's start with an upload right from your computer. To upload from your computer, you just need to have the documents saved on your hard drive (on your Desktop or in your Documents folder, for example).
Direct Upload
1. First, open the SkySlope file. Click on Manage Listings or Manage Transactions to locate the address, and then single-click to open the file. Once the file is open, click on the tab labeled Checklist.

2. The Checklist is a list of required documents set up by the brokerage, based on the file type. Locate the Checklist item where the document should be attached. For example, when uploading the Exclusive Right to Sell, locate the "Exclusive Right to Sell" or "Listing Agreement" on the Checklist.
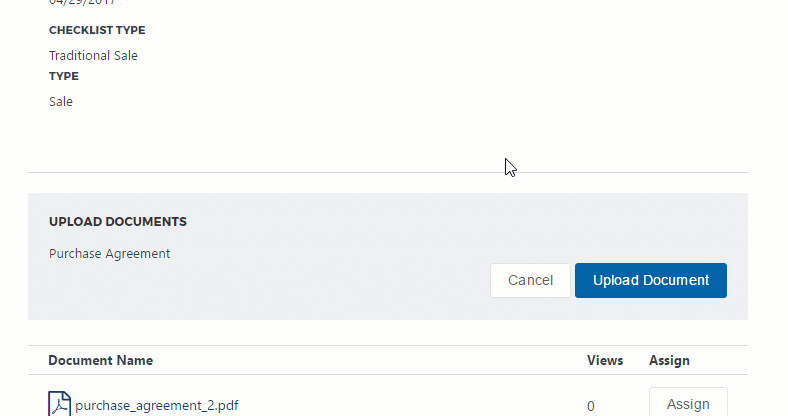
Once that Checklist item has been located, click on Attach on the right side of the page.After clicking Attach, click on the blue Upload Document button on the right side of the page. Then, browse the computer to find the document to be uploaded.

3. After locating the document, click on the document name, and then click Open. The page will redirect to SkySlope and the document will be scanned. After the document is done scanning, click on Start Upload to upload the document.
Pro Tip: To start the scan right away, double-click the name of the document. Lightening fast!
4. Now it's back to the Checklist to see that the document is Pending! That means it has been attached to the Checklist and the document is ready for admin review!

If there documents in an email that need to be attached to the Checklist, simply forward that email into SkySlope to upload that document. Let's get started.
Email Upload
1. First, open the SkySlope file. Click on Manage Listings or Manage Transactions to locate the address, and then single-click to open the file.

2.Once the file is open, in the upper-right corner, there is an email. Copy that email address.

Support Tip: To copy the email, highlight the email with your cursor. Then, right-click with your mouse and select Copy (or CTRL + C). If you're using Firefox or Chrome, right-click on the email and select "Copy Email Address".
3. Once the email address is copied, open the email that contains the attached document. Important: The documents must be an email attachment. If they documents are accessible via a link in the body of the email, this process will not work.
After opening the email, forward the email with the attached documents to the SkySlope email address that was copied, and away it goes!

4. After a few moments, your email will come through to your file. To attach the document to the Checklist, go to the Checklist and click on Attach. Find the document from the list of available docs, and then click on Assign to move it to the Checklist.

Fax Upload
If there are some paper documents that need to be moved into the SkySlope file, have no fear. The documents can be faxed right into your SkySlope file! Keep reading to get started.
1. First, open the SkySlope file. Click on Manage Listings or Manage Transactions to locate the address, and then single-click to open the file. After opening the file, go to the Documents tab.

2. On the Documents tab, click on the Fax Cover button in the center of the page. After clicking that button, type the desired file name for the documents into the pop-up window. Click Save.

Pro Tip: Check "Remove Cover Sheet" to remove the cover sheet from the faxed document bundle.
3. After saving the file name, the Fax Cover Sheet will open as a PDF. Print this PDF and place it on top of your stack of documents.

4. Use a fax machine to fax your documents and the Fax Cover Sheet to the fax number listed on the Fax Cover Sheet (888-456-0640).

5. Go back to the SkySlope file and open the Documents tab. Any faxed documents will be stored on the Documents tab.

6. To attach the document to the Checklist, go to the Checklist and click on Attach. Find the document from the list of available docs, and then click on Assign to move it to the Checklist.

Not seeing your documents? Reach out to Support via live chat at support.skyslope.com, or give us a call, 24/7 at 916-560-1815.
HOW TO MOVE A DOCUMENT TO TRASH
1. First, open the SkySlope file. Click on Manage Listings or Manage Transactions to locate the address, and then single-click to open the file. After opening the file, go to the Documents tab.

2. On the Documents tab, locate the document(s) to be moved to the Trash. Check the box to the left of the document(s) name. After selecting the documents, scroll to the top of the page. Click on the Move button. Then select Trash to move the documents to the Trash folder.

That's all it takes! If the documents ever need to be removed from the Trash, just reverse the process. On the Documents tab, scroll to the bottom of the page and click on Trash to open the Trash folder. Select the documents to be restored. Scroll to the top of the page, and click on Move. Then select Main Documents.
HOW TO SEND BUNDLED DOCUMENTS
1. First, open the SkySlope file. Click on Manage Listings or Manage Transactions to locate the address, and then single-click to open the file. After opening the file, go to the Documents tab.

2. All of the documents in a file are listed on the Documents tab. On the left side of the page, use the check box to select all of the documents to be included in the bundle. Then, scroll to the top and click on Share Docs.

3. Type the name for your Document Bundle. For example, "Signed Listing Docs for 640 Laurel Drive" or "Listing Docs for John and Jane". This is how the recipients will view the name of the Document Bundle. After typing the name, click on Create.

4. After clicking on Create, you will see a pop-up. In this window, there will be a web link that you will use to share your Document Bundle. Anyone who has access to this link will be able to click on it and view the documents. To send your documents, compose an email (either in SkySlope or from your own email) and paste the link in the body of the email, and send it off!
Pro Tip: Click on Copy Link to quickly copy the link to your computer so you're ready to paste & send!

HOW TO OPEN & VIEW DOCUMENT BUNDLES
1. Once you've sent the Document Bundle link to your recipient via email, your recipient will first have to open their email to view the link. Their email may look something like this:

2. After they've opened the email, they will need to click on the link to view the documents. Once they've clicked on the link, they will be redirected to a SkySlope page with a list of the documents in the bundle. Click on the name of a PDF to open that document.

On the left side of the page, they will be able to see some information about the agent who sent them the documents.
HOW TO SHARE FILES WITH OTHER AGENTS
1. First, open the SkySlope file. Click on Manage Listings or Manage Transactions to locate the address, and then single-click open the file.

2. After opening the file, either the Listing Info or the Transaction Info page will open. On this page, locate the Co-Agent or Co-Listing Agent field. Click on Add to add another agent. Begin typing the agent's name to search for agents in your company. Once the agent is found, click on their name and then click Share.

3. Now the page will redirect back to the Listing tab. Important: Click on Next in the lower right corner to save the changes made by adding the other agent. This will officially grant the other agent access to the file.

To remove another agent's access: Open the file, and click on the Add/Share button next to the Co-Agent field. Click on the X to remove the other agent's name. Then click on Share. When back in the file, click on Next to officially remove the other agent's access.
HOW TO DOWNLOAD AND SHARE ARCHIVED FILES
1. From the SkySlope home page, click on the Access Archives icon to open your archived files. Then use the search bar to locate your property file.

2. Once you've located your property file, you will see a drop-down menu for that file on the right side of the page. You will use this drop-down to download either All Documents or Checklist Documents (meaning only the documents attached to your Checklist).
Select your choice to start the download.

3. The documents will download to your default download location (usually your Downloads folder) in a compressed .zip file. This type of file automatically compresses the PDFs upon download to make them more shareable.
Open your file explorer and locate the downloaded .zip file that contains your documents. The icon for a .zip file will look like a stack of books that has been bundled together, or a file folder with a zipper.


4. To share your file, you can drag & drop the .zip file onto a removable CD or Flashdrive. If you want to share the documents electronically, you can upload the .zip file to a document sharing website, such as Google Drive or Dropbox.
NEED TO BRING A BLANK CD OR FLASHDRIVE FOR THIS
Support Tip: For an even easier way to share your SkySlope documents, check out How to Send Document Bundles.
Was this article helpful?
That’s Great!
Thank you for your feedback
Sorry! We couldn't be helpful
Thank you for your feedback
Feedback sent
We appreciate your effort and will try to fix the article