

With the Designated Signing Broker feature, you don't have to remember who needs to sign off on a file — SkySlope Forms automatically assigns the right Signing Broker to every contract, so you can focus on closing deals instead of tracking down signatures.
In this article, we'll go over:
- Getting Started
- View Your Signing Broker(s)
- Assign a Default Signing Broker
- Unassign a Default Signing Broker
- Select a Signing Broker in a File
- Remove a Signing Broker from a File
Getting Started
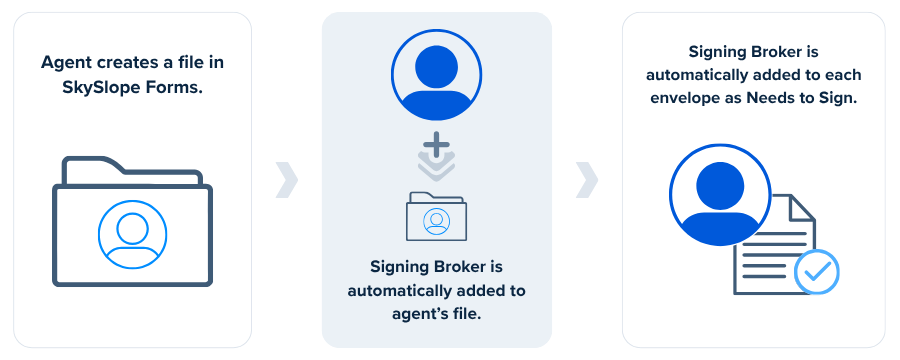
If your brokerage uses Groups in SkySlope Forms, the group you're assigned to may also have a designated Signing Broker. With a designated Signing Broker, each time you create a file in SkySlope Forms, the Signing Broker will automatically be added to your file. Each time you send a document for signatures, the Signing Broker will automatically be added as Needs to Sign on each envelope.
Managing Signing Brokers
There are several ways to customize Signing Broker settings. The options vary depending on the number of Signing Brokers in your group.
View Your Signing Broker(s)
To view the Signing Broker(s) assigned to your group:
- Click on your name in the upper right.
- Select My Team.
- Locate the Signing Broker section. Here you will see a list of anyone designated as a Signing Broker in your group.
Assign a Default Signing Broker
If there are multiple Signing Brokers in your group, you can assign a default:
- Click on your name in the upper right.
- Select My Team.
- In the Signing Broker section, locate the name of the individual you want to assign as the default Signing Broker.
- Click the ... icon and select Assign.
- This individual is now your default Signing Broker and will be assigned to every new Forms file you create.
Note: If there is only one Signing Broker in your group, that one person will be assigned to each file by default.
Unassign a Default Signing Broker
Whether you have one or multiple signing brokers, you can unassign them as the Signing Broker for your account.
- Click on your name in the upper right.
- Select My Team.
- In the Signing Broker section, locate the name of the individual you want to unassign as the default Signing Broker.
- Click the ... icon and select Unassign.
- In the pop-up window, confirm that you'd like to unassign.
Note: If there is only one Signing Broker in your group and you unassign them, no Signing Broker will be added to your files by default.
Select a Signing Broker in a File
If you have multiple Signing Brokers in your group, you may opt to leave all Signing Brokers enabled, and select which Signing Broker you'd like to be assigned within each individual file. This workflow may work best for an agent who works across several states or belongs to several different groups.
- From the Forms dashboard, create a new Forms file.
- Towards the top of the Create File page, you will see a Signing Broker drop-down menu. Use the drop-down menu to select a Signing Broker for the file.
- Proceed with creating your file. The selected Signing Broker will be automatically added as Needs to Sign on all envelopes in this file.
Note: To be able to select a Signing Broker within a File, you must have more than one Signing Broker assigned in your group.
Remove a Signing Broker from a File
To remove a Signing Broker that has been automatically added to a file:
- Open the Forms file.
- Navigate to the File Details tab.
- Scroll down to the Contacts section.
- Locate the Signing Broker contact and click Remove.
- Click OK to confirm.
If you have any other questions about using a Signing Broker in SkySlope Forms, please reach out to our Support team. Happy SkySloping!
Was this article helpful?
That’s Great!
Thank you for your feedback
Sorry! We couldn't be helpful
Thank you for your feedback
Feedback sent
We appreciate your effort and will try to fix the article